
On this page you will find the answers to frequently asked questions.
Can I adjust the force of a gas strut?
Yes, all our gas struts are adjustable gas struts. Our gas struts are shipped with a set force. These struts have a valve. If you push the valve, the gas is vented out and the force is lowered. Please be careful: when the force is too low, the gas strut becomes unusable.
Do you offer pneumatic roof struts?
At Gasspringsshop.co.uk we sell gas struts for different applications, including roof tops for campers and cars. We call these pneumatic roof struts, but they are not really pneumatic. The gas springs contain a cylinder with compressed gas (and not compressed air), but behave in a similar way to pneumatic applications.
What are heavy duty gas struts?
Need heavy duty gas struts? Gasspringsshop.co.uk sells gas struts with a force as high as 2500N for heavy duty applications. Do you want to use a gas strut outside without cover? Then we recommend our stainless steel (304) gas struts.
Do you offer short gas struts?
Yes, our shortest gas strut has a length of 92 mm (9,2 cm) without mountings. It’s the 4-12-30.
My ordered gas springs seem to be too strong in retrospect. What should I do?
Gas springs play a vital role in many everyday applications, from car boot lifts to industrial machinery. They provide controlled movement, making tasks easier and safer. But sometimes, you might find that the gas springs you’ve ordered seem too strong or don’t operate as expected. If this sounds like your situation, don’t worry. We’re here to help you find the right solution to ensure your gas springs perform as they should.
What are gas springs?
Gas springs, also known as gas struts, are mechanical devices that use compressed gas to exert force, helping lift, hold, or support objects in a controlled manner. The gas is sealed inside a cylinder, and the pressure applied to the piston creates a lifting force. This force can be adjusted, and gas springs come in different strengths depending on the job at hand.
Why might your gas spring seem too strong?
Sometimes gas springs can be a little stiff, especially the first few times that they are used. If a gas strut has been lying in stock for a while, the seal with which the nitrogen gas is kept inside can stick to the rod of the gas strut. This sometimes causes the gas strut to retract heavily on the first part during its first use. You can then take the gas strut off the hatch and push it in with a lever. After that, it will move better.
What to do if your gas strut feels too strong
If you’ve confirmed that your gas strut is too strong, you can choose to let some gas out. Please read the following instructions:
http://www.hahn-gasfedern.de/fileadmin/Media/PDF/Ventile_en.pdf (English)
http://www.hahn-gasfedern.de/fileadmin/Media/PDF/Ventil_dt.pdf (German)
Hold the gas spring facing away from you, whilst being careful not to damage the gas strut. You can then allow the gas to escape incrementally until the desired force is reached.
Choose the right gas spring from the start
One of the best ways to prevent problems with gas springs is to select the right one for your specific needs. When ordering a gas strut, use one of our online tools. This will help you avoid choosing a gas spring that’s too strong or too weak for your application. You can find a calculator, configurator and replacement tool on our website.
More information
Do you need help or are you looking for more information? Don’t hesitate to reach out to our customer service at [email protected] or +44(0)24 7645 5580.
Can I return gas springs?
We do our best to help you find the right gas springs. However, if you have chosen gas struts which in retrospect do not fit well or turn out to be too strong or too weak, then there is the option to return the gas springs. You may submit a request for returns via our customer service. Within two business days you will receive a returns number with which you can return the gas springs against. You can only return items if you make the request to return within eight days of receipt and if the gas springs are sent in an unused condition, free from any damage with the original packaging and the returns number. The purchase price of the purchased gas springs and end fittings will then be credited (Note: the shipping costs are borne by the customer.) if you want to order other gas springs instead of the gas springs that you want to return, then we recommend that you place this order separately. We treat the returns and the new order as two separate cases.
If there is something wrong with the gas springs upon delivery, you can also make this request through the customer service within eight days. We will then assess the case and provide a solution.
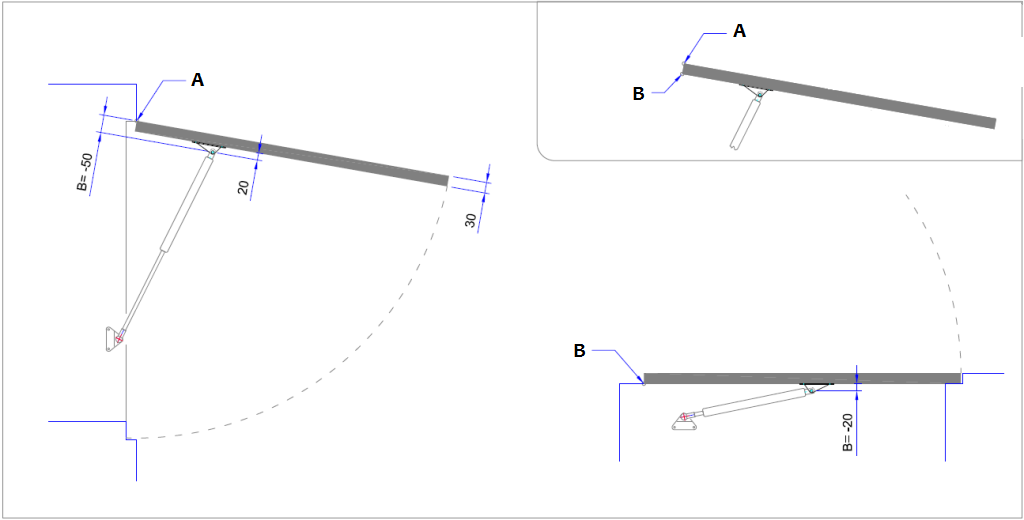
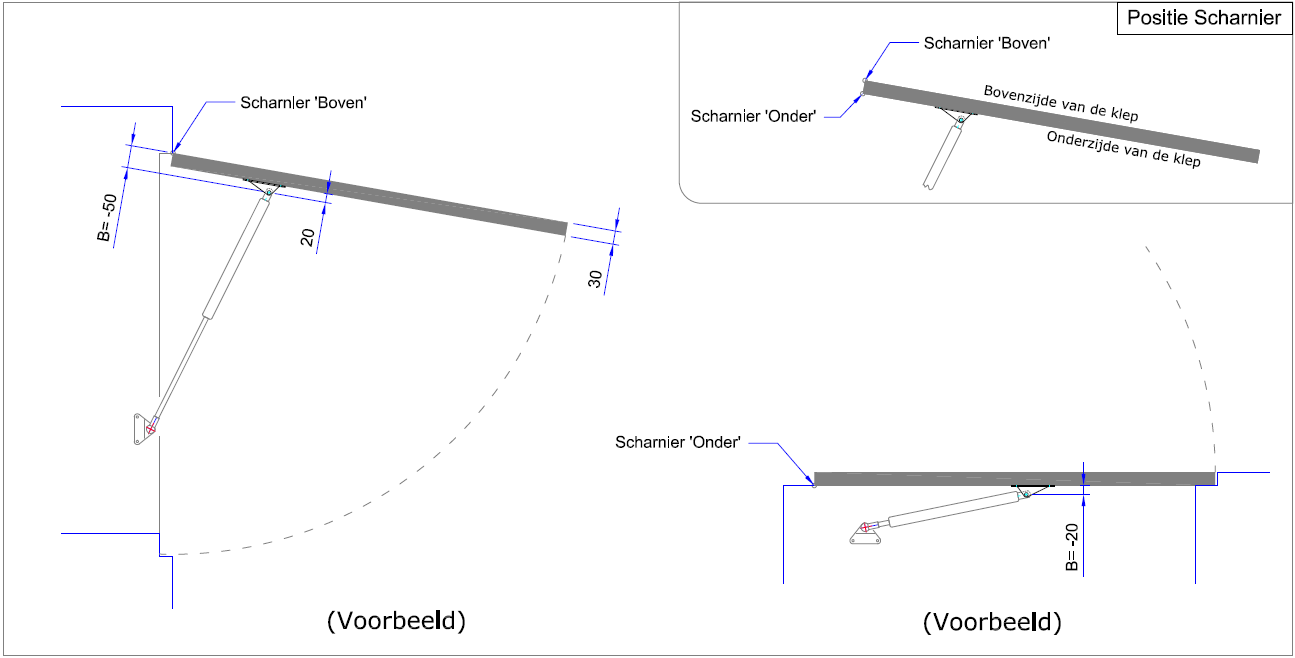
Why is the B measurement important? And how do I change that while maintaining the operation of the gas springs?
In the result of the Calculation tool the B measurement, along with the A measurement, displays the position of the centre of the end fitting of the gas spring to the cover.
Both of these distances will be shown from the centre of the pivot point from the cover.
The A measurement is a distance measured along the cover and the B measurement is a distance measured perpendicular to that.
The A measurement is a value that comes out of the gas spring calculation while the B measurement is directly dependent on the distance between the end fitting of the gas strut and the surface of the cover.
The Calculation tool sets the B measurement on the basis of the entered thickness of the cover and the position of the pivot point relative to the cover with thereby the point of attachment of the gas spring being 20 mm away from the cover surface as standard.
Below are some examples of the B measurement set by the Calculation tool (A = hinge on top, B = hinge on bottom):
Once ‘Calculate’ is pressed in in Calculation tool (in Step 2), the B measurement is determined by a standard calculation rule and gas spring application is calculated.
The B measurement, which is then as shown in the result of the calculation, must correspond to the B distance from the point of attachment of the gas spring as it will eventually be mounted on the cover.
It may be that the final B distance from the attachment point of the gas spring is different from the B measurement as calculated as standard by the Calculation tool (A= pivot point):
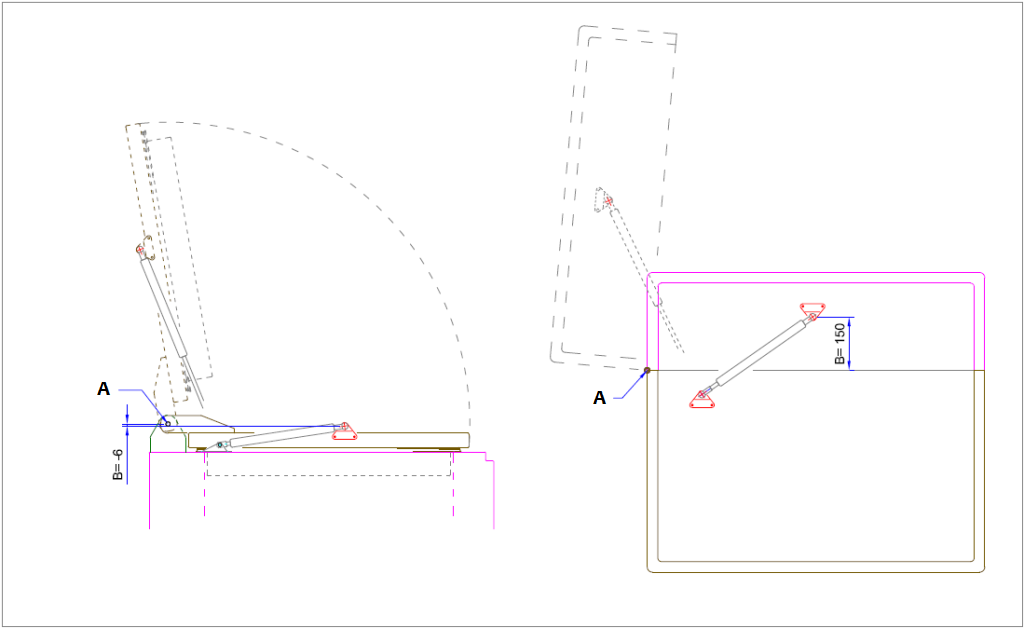
In that case, the B measurement must be adjusted.
The main reason for that is that the attachment of the gas strut to the mounting point, indicated in the calculation tool by the C measurement and D measurement, must geometrically match the retracted and extended gas spring length combined with the rotation of the cover (from ‘closed’ angle to ‘open’ angle).
Before adjusting the B measurement, note the hand forces as they are shown in ‘show open’ and ‘show closed’.
Only then adjust the B measurement and change the A measurement until, in both ‘open’ as well as ‘closed’, the previously noted values for the hand forces are reached again.
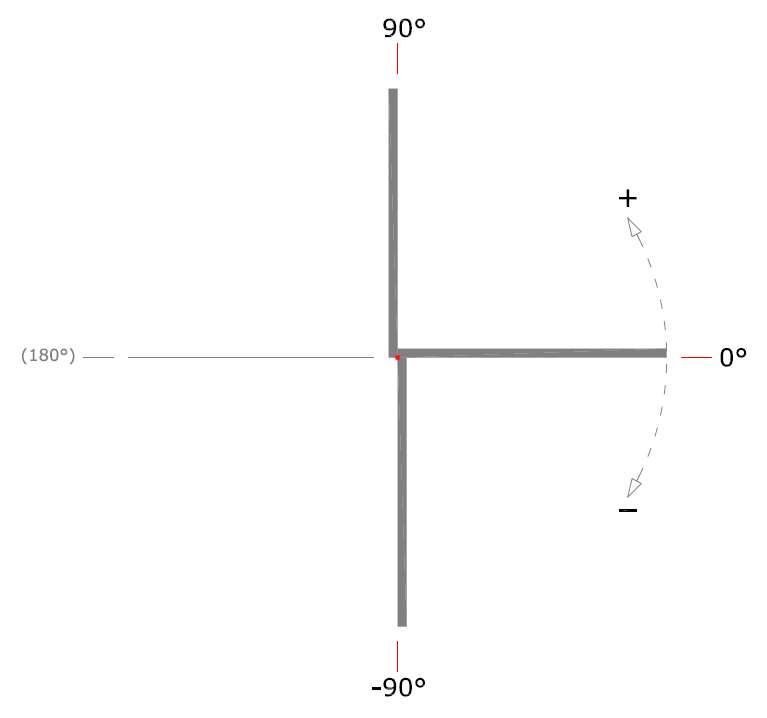
How do I determine ‘closed angle’ and ‘open angle’ of a cover?
Filling in the Cover angle ‘closed angle’ and ‘open angle’ (Start angle and End angle)
The following agreements – in accordance with the hour hand of the clock – apply here:
- 12 hours on the clock = 90 degrees …. cover stands right up
- 3 hours on the clock = 0 degrees ….. cover lies horizontally ……………..’Lying’ Cover
- 6 hours on the clock = – 90 degrees …. cover hangs down vertically ….. ‘Hanging’ Cover
Left part of the page: Cover positions such as those which could occur with a ‘Lying’ Cover:
- Roof hatch (skylight)
- Attic hatch
- Toy box
- Basement hatch
- Garden box
- Hatch cover
- etc.
Right part of the page: Cover positions such as those which could occur with a ‘Hanging’ Cover:
- Sales vehicle hatch
- Takeaway counter hatch
- Sun shading
- Safety screen
- Awning on horse trailer/handyman bus
- etc.
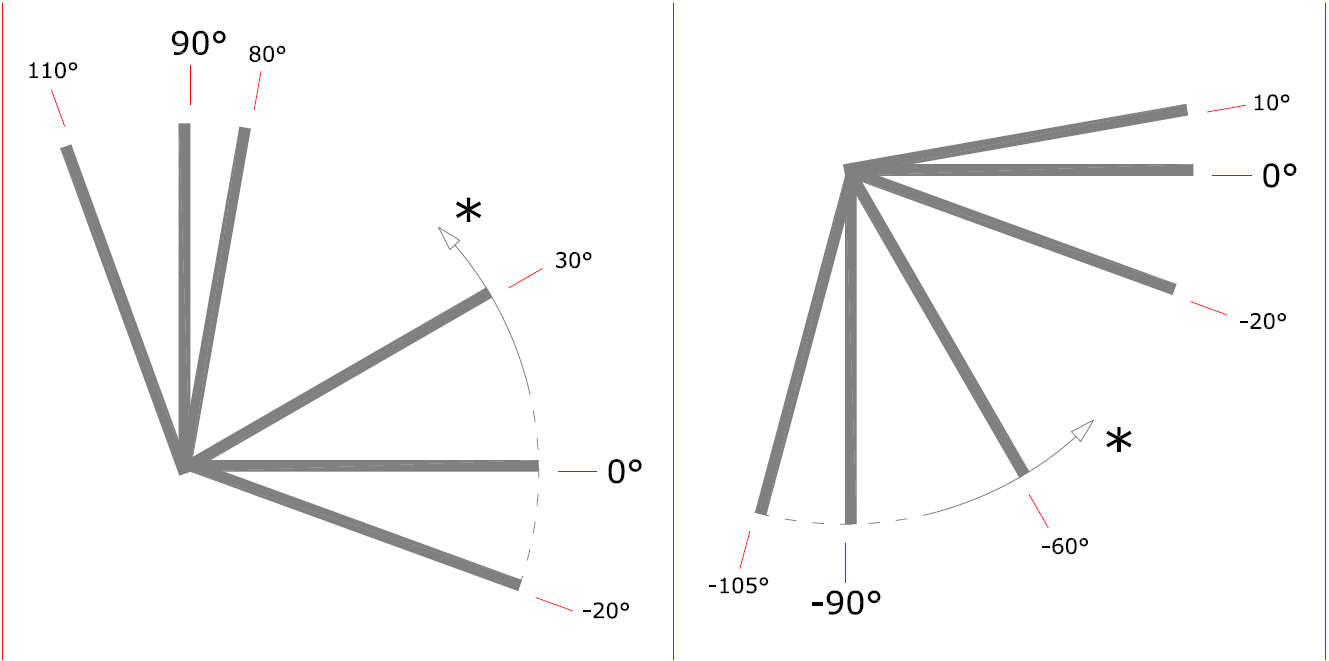
* Cover rotates from Start angle to End angle (length of gas spring is then at a maximum)
The intermediate Cover angles can be determined, for example, with an inclinometer or by means of a smart phone (with an inclinometer app).
Important!
Do not just accept the inclinometer or smartphone reading as the actual cover angle.
But first, determine the difference between Cover position and horizontal or between Cover position and vertical and then calculate the actual Cover angle from those according to the aforementioned statement.
Cover angles can also be determined by measuring and calculating.
In what ways can such a measurement be carried out and how the calculation is then done, is illustrated in the following examples:
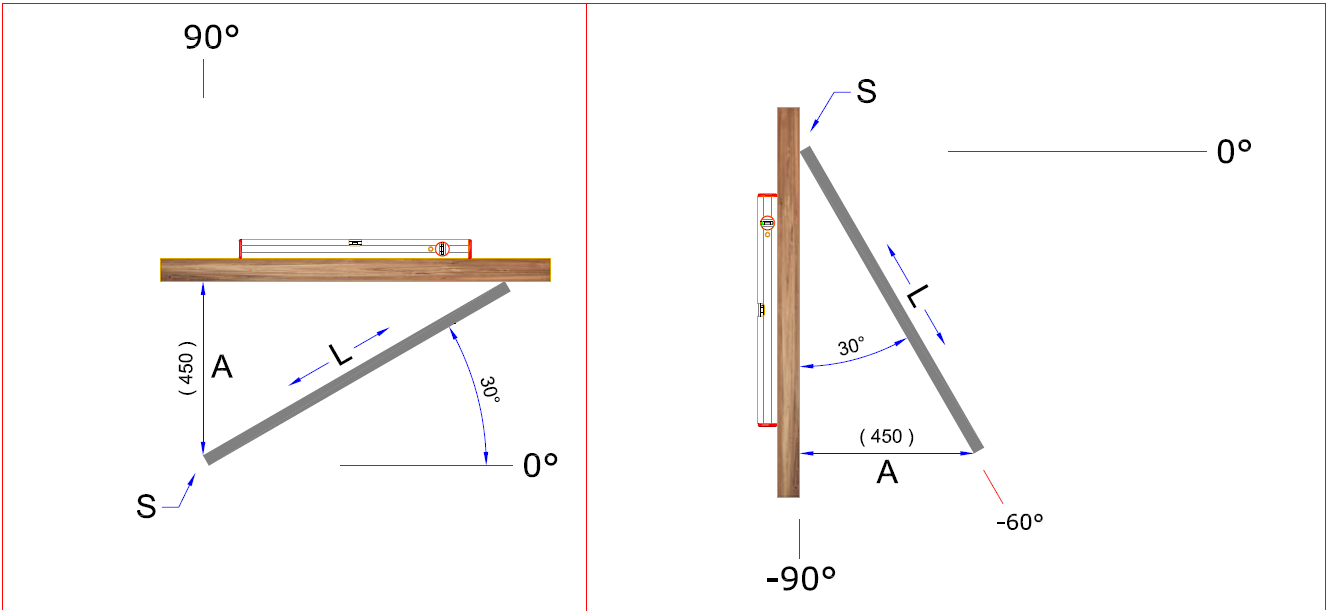
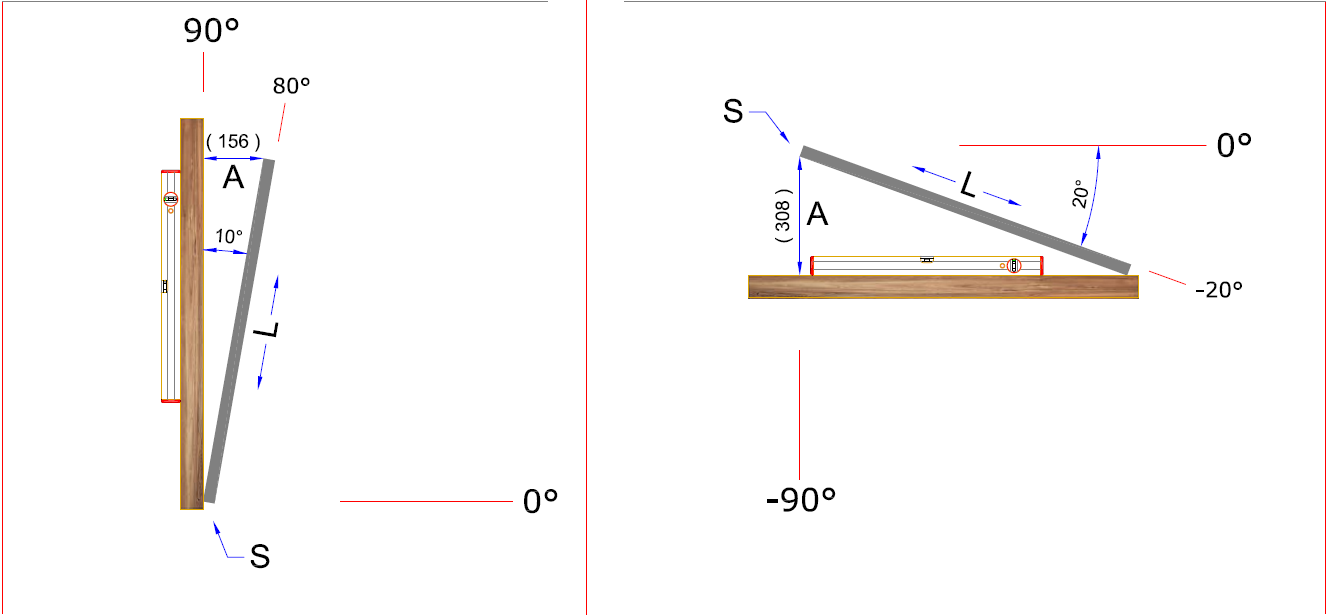
A = inclination of the Cover measured from horizontal (or measured from vertical in another example)
S = Hinge side of the Cover
L = Length of the Cover
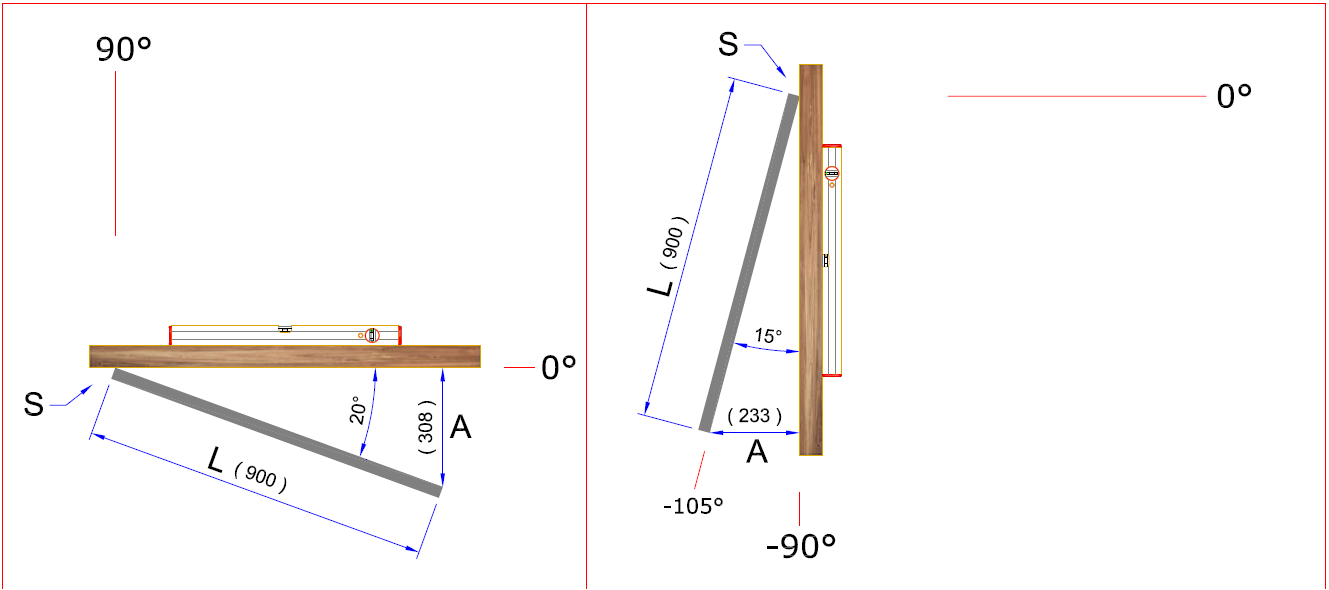
Calculating a Cover angle:
- search on Google for: 1+1 –> Google shows a calculator
- press on the button ‘Rad’ –> a button ‘Deg’ appears
- press on the button ‘Inv’ and after on the button ‘sin’
- key the inclination in with the mouse –> for example: 3 .. 0 .. 8
- press the key with the division sign
- key in the Length of the Cover with the mouse –> in this example: 9 .. 0 .. 0
- finally press the button‘=’
The result is the inclination of the Cover with respect to horizontal or with respect to vertical (depending on the method of measurement) The result: 20.01 -> rounded up by 20 degrees, we convert to the Cover position: 0 degrees – 20 degrees = 20 degrees
For the Cover position in the example drawn beside it we find: -90 degrees – 15 degrees = -105 degrees
Tip! First copy the calculation from the example so you know whether you have understood the process well.

How do I measure the weight of my cover?
How do I measure the weight of my cover? Under the weight we mean the ‘loose’ actual weight. It is best if you measure this with a scale. When it is not impossible or inconvenient to weigh the cover ‘loose’ then it is described below how you can still determine the weight. Our experience is that estimating the weight is not accurate enough and we therefore discourage this strongly.
- Determine, with the cover in a horizontal position, with what force you need to support the cover when you grip it on the outermost edge opposite the hinges. For this please stand on some adult weighing scales and then you determine your weight gain at the moment you support the horizontal cover (Caution! Exert the force vertically).
- When it is difficult to support the cover with your hands, you can also attach a rope to the bottom of the cover and put it round the outermost edge in order to support the cover (Caution! Hold the rope vertically).
- However, if the cover is ‘closed’ in the horizontal position then lift the cover a little, during this measurement until the cover is free of the surface which it rested on earlier, over the entire length of the outermost edge.
Your weight gain, multiplied by 2, is generally a good approximation of the weight of the cover.
- Alternatively, you can let the horizontal cover, on the outermost edge opposite the hinges, be supported directly on the bathroom scales with a ruler or stick (first lay a board on the scales).
- However, if the cover is ‘closed’ in the horizontal position then adjust one or two things until the cover is free of the surface which it rested on earlier, over the entire length of the outermost edge (longer ruler or stick, thicker board on the scales or setting the scales higher).
The weight which the scales indicate minus the weight of the board incl. the ruler or stick, multiplied by 2, is generally a good approximation of the weight of the cover.
How much Newton (N) force should the replacement gas spring be?
Often there is a type number followed by three digits with an N on the gas spring. In principle, you can usually assume that this is the number of Newton’s. You can then fill this into the Configurator under Force. The other dimensions of the gas spring to be replaced can be found if you follow the steps on ‘how do I find a replacement gas spring?‘.
If the number of Newton is not on the gas strut to be replaced or if it is illegible, we recommend that you calculate the number of Newton using the Calculation tool. It is best to calculate the gas springs all over again, so also include the dimensions of the gas struts and the end fittings. In this way you are sure that the gas springs fits your cover, lid or other application. We recommend that you consult the Help for filling in, and to perform this step by step.
How do I find a replacement gas spring for my sunbed?
Are you looking for gas springs for your sunbed or tanning light? We sell various universal gas struts at Gasspringsshop.co.uk . In many cases there are special gas springs on sunbeds. These gas struts are provided with additional resistance so they remain standing in all positions. We do not sell these kinds of gas springs (currently). We recommend you to buy these gas struts from the manufacturer or dealer of your sunbed.
If there are no gas springs with extra resistance on your sunbed, your sunbed will only stop by itself in the open and closed positions and you may be able to find a replacement in our shop. You will then need to measure your gas spring. The issues that are important for you to measure you can find here . If you have measured these things, you can use our Configurator to see if you can find a gas spring similar to replace your sunbed gas strut.
How do I find a replacement gas spring?
Before you try to find a replacement gas spring type it is necessary to find out how strong the ‘old’ gas strut or gas springs are.
Usually there is printed information on the gas spring (or on a label affixed to the housing) in which something is reported such as…. N.
The ‘N’ stands for Newton and the numbers that are in front then represent the number of Newtons.
For example:
300 N = 300 Newton
0300 N = 300 Newton
Once you know how strong (how many newtons) the gas springs must be, you can proceed to Step 1.
Step 1. With the ‘old’ gas strut measure: (Note: in millimetres!)
- the thickness of the rod (the thin part)
- the thickness of the housing (the thick part)
We sell the following types of gas spring:
Type thickness of rod thickness of housing
4-12 4mm 12mm
6-15 6mm 15mm
8-19 8mm 19mm
10-23 10mm 23mm
14-28 14mm 28mm
- Choose a replacement gas strut type from this table that comes closest to the just-measured thickness of the rod and the thickness of the cylinder.
# Note down for the replacement gas spring: ‘gas spring type = … – … ‘
It may be that you can unscrew the attachment (screw eye, ball head, etc.) of the ‘old’ gas strut, at one or both ends. In so far that you want to reuse those make sure that the screw thread size matches the screw thread size of the replacement gas spring type.
You can check this as follows:
- On our website click on the tab ‘Configurator’ and choose a gas spring of the replacement gas spring type in the middle column (the length is unimportant at this time).
- Choose ‘None’ in the left and right column.
- Move the mouse/ cursor over the gas spring so that information is displayed about the screw threads that are on both ends of the gas spring.
You can select end fittings which you have to buy new, in the left and/or right column.•
- Move the mouse cursor over the selected connection so that a dimensional drawing of it is displayed.
- This way, you can check whether the end fittings can be suitably mounted in the existing gas spring application.
If it appears that the connections will not be a problem, you can proceed with Step 2.
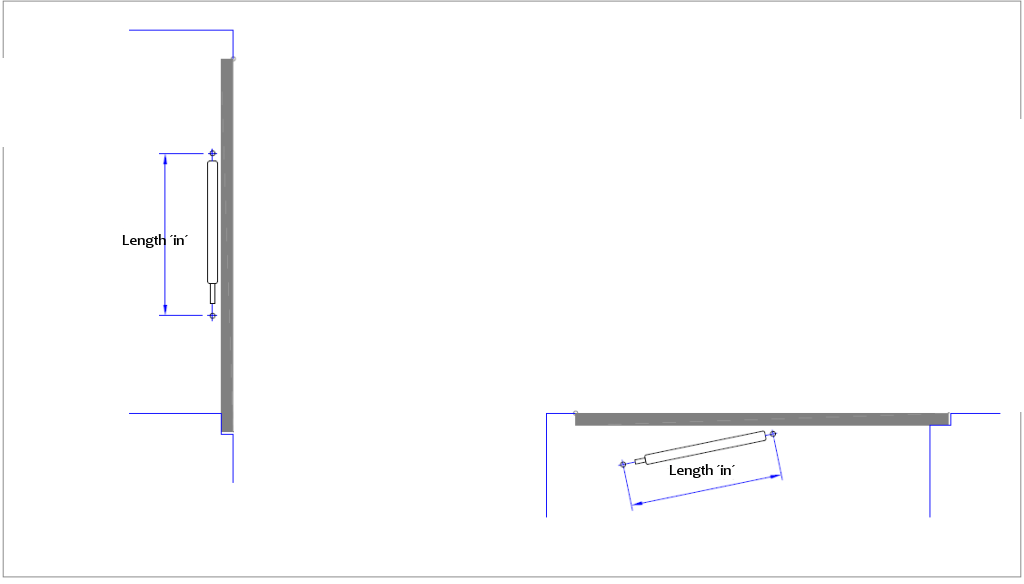
Step 2. Measure the maximum length of the ‘old’ gas spring
For instance if we open a cover completely, then the gas spring extends completely into its maximum length. We must now determine this maximum length, measured centre-to-centre:
- fully open the cover and measure the distance from the centre of one end fitting to the centre of the other end Fitting
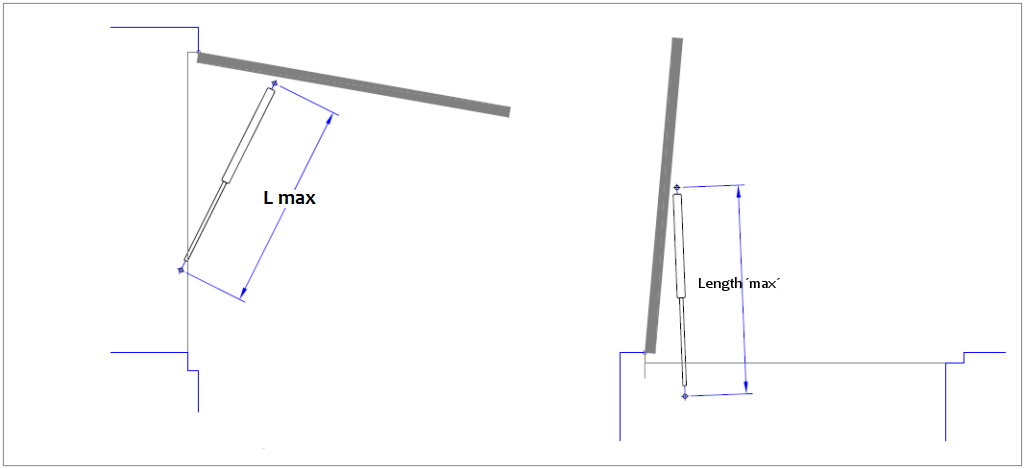
Write down for the replacement gas spring: ‘Length ‘max’ = …… mm.’
Step 3. Measure the shortest length of the ‘old’ gas spring.
If we close the cover , the gas strut is pushed in to a certain length. It is almost never the case that the gas spring is then completely (until the end of its stroke length) pushed in. A piece of unused stroke length is almost always left over. By taking into account this fact we are more likely to find a suitable gas spring (in terms of length) as a replacement for the ‘old’ gas strut. Therefore determine, with the ‘old’ gas spring still mounted, the shortest occurring centre to centre distance between the end fitting of the gas spring:
- Close the cover and measure the distance from the centre of one end fitting to the centre of the other end fitting of the ‘old’ gas spring.
If this measurement, however, is not feasible because, for example, the space under or behind the cover is insufficient to measure there, you can read below how you can determine the shortest occurring centre to centre distance:
- Open the cover or the hatch.
- Tie a thin rope tightly around the rod (the thin part of the gas spring).
- Move the rope until it is against the cylinder (the thick part of the gas spring).
- Close the cover or the hatch so that the gas spring gets its shortest occurring length.
- Open the cover or the hatch completely and measure the distance between the moved rope up to against the cylinder.
- Subtract this measurement from the previously measured ‘Length ‘max’’.
# Write down for the replacement gas spring: ‘Length ‘in’ = …… mm.’
The replacement gas spring must, when fully retracted, measured centre to centre between the connections, be able to become a bit shorter than the ‘Length ‘in’’ value found.
Step 4. Choosing the most suitable stroke length for the replacement type gas spring:
- On our website click on the tab ‘Configurator’ and choose a gas spring of the replacement gas spring type in the middle column (the length is unimportant at this time).
When you are re-using an already existing attachment at one or both ends, proceed with step 5.
- Choose the new end fittings to apply in the left and right column (the maximum centre to centre measurement between connection is shown)
- Push the gas spring in completely with the mouse/cursor in order to read the shortest possible centre to centre measurement
- In the middle column choose a stroke length that is as close as possible to ‘Length ‘in’ from below, that is associated with the replacement gas spring type.
Now compare the extendend lenght of the selected gas strut with the previously measured ‘Length ‘max’’ and assess the result of this with a possible difference in length (cover opens slightly less far or slightly farther).
If this seems acceptable then you have succeeded in your attempt to find a replacement gas spring!
Will my cover be more heavily loaded when I use gas springs?
Yes, the cover is generally more heavily loaded when gas springs are used. It is therefore important that you assess whether your cover and the hinges are strong enough before you apply the gas struts. The figure below shows a cover of 25kg with and without gas springs:
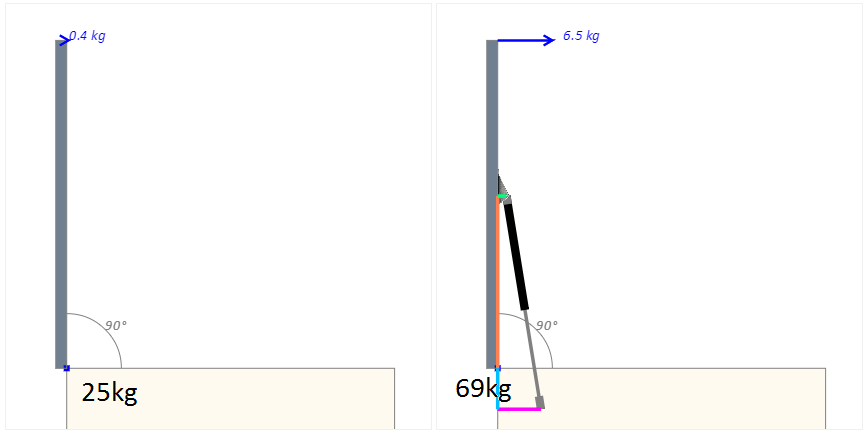
The cause of the higher forces is the fact that the gas spring generally works over a shorter moment arm of force. To be able to carry the entire moment arm of force of the cover a larger force is therefore required. The gas spring therefore also has an extension force which is much greater than the weight of the cover. In this example, the gas strut has an extension force of up to 420N or 43kg. This is a lot more than the 25kg weight of the cover.
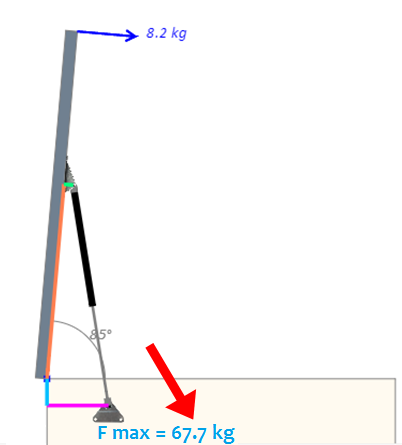
If you find a too large hinge force in the Calculation tool, then you can lower it by choosing a longer gas spring. This will then work over a larger moment arm, and therefore requires a smaller force. The gas spring will naturally still need to fit. This can be seen in the Calculation tool figure and be measured in your own application.
I have a gas spring with a number on it. Can gasspringsshop.co.uk do something with this number?
You will need to look up the specifications yourself before using our gas strut configurator to try and construct a replacement model for this type of gas spring.
In order to increase your chances of success we would like to refer you to the list of ‘Frequently Asked Questions’ for the answer to the question: ‘how do I find a replacement gas spring?’
Does it matter if I mount one or two gas springs on my cover?
Yes, that definitely matters. Applying only one gas spring is cheaper, but this can have its drawbacks. If you choose one gas strut instead of two, then this gas spring will basically need to be twice as strong. Usually our Calculation tool (which will calculate what kind of gas springs you need) will also choose a slightly more robust gas strut if you indicate that you want only one gas spring. There will need to be more force in just one gas spring. We recommend that you use two gas springs and mount them on both sides of the cover. The forces will then be distributed evenly across the cover or the hatch. This results in everything remaining straight and true. If you do choose one gas spring, we recommend you mount it in the middle of the cover, if you mount the gas strut on one side of the cover, most of the load will transfer to the opposite side, which will cause it to slant and twist or remain open and not close properly. With our Calculation tool you can easily see what the difference is if you indicate whether you are looking for one or two gas springs. We recommend that you use this Calculation tool in determining the gas spring or gas springs that you are looking for, because it takes into account many different forces at play. The strength of the cover and your hinges are obviously not included in the calculation because they are unknown to us.
What is the delivery period of my order?
In principle all the products that we offer via our web shop are in stock and you can expect the products to be with you within 1 – 2 working days, except for items for some parts of Scotland, the Highlands and Northern/Southern Ireland which can be 2 – 5 working days. For larger quantities it is advisable to ask us what the delivery period is. You can always inquire about the interim status of your order by sending an email.
Can I also order by email or phone?
We kindly ask you to place your order through our webshop.
This can be done via the Configurator and from the Calculation tool.
The Configurator lets you compose your order after which you click on the shopping basket so that the gas springs and/or end fittings are put into the shopping basket and the contents of the basket are displayed. You can, by going back to the Configurator, add other products to the contents of the shopping basket. You can also still change the number of products. Do not forget to click on ‘Update basket’ afterwards. Then ‘Proceed to Checkout’ you can place your order by filling in your address details and by finally making your payment.
The Calculation tool first calculates which gas springs and end fittings you need and then by clicking on the shopping basket, you go to place your order. The contents of the shopping basket will be displayed and via ‘Continue to Checkout’ you can place your order by filling in your address details and finally making your payment.
Does it matter in which position I mount a gas spring? It can also be done the other way around.
The cylinder of a gas spring (the ‘thick’ part of the gas spring) is filled with nitrogen gas. The nitrogen gas is forced in under high pressure. The higher this pressure, the greater the force with which the piston rod (the ‘thin’ part of the gas spring) wants to slide out of the cylinder. In order to ensure that no nitrogen gas escapes, while the piston rod retracts and extends, the piston rod slides through a seal which encloses the piston rod tightly at the end of the cylinder. As well as the nitrogen gas there is also a small amount of oil in the cylinder. The oil provides extra cushioning as the piston rod reaches its outermost position (fully extended). The oil has an additional purpose, which is to seal and lubricate, so that the piston rod can slide in and out with less friction.
The position of the gas spring can vary dramatically from when a lid (cover) is open to when its closed. With the boot (tailgate) of the car the position of the mounted gas spring entirely reverses. Therefore, when placing a gas strut, we need to ensure that the amount of oil that is in the cylinder, will automatically flow to the seal in the whatever situation it finds itself, with the lid (cover) open or closed.
I cannot push the gas spring by hand. Is the gas spring broken?
The gas spring is probably not broken. The extension force of the gas strut is 500N, it states this on the label, and it means 500 Newton. In kilogrammes, this is about 500/10 = 50kg. To compress the gas spring requires even more force, because of the friction of the seal that keeps the nitrogen gas in the gas strut. The gas spring should still be able to be pushed in by hand up to about 100N, above that, then it becomes very difficult and you may damage the gas spring. Therefore to compress the gas spring for the first time, its probably better to mount it in the application, this way the cover or hatch then acts as a lever, making it easier to push by hand.
If this fails! Then it maybe one of the following:
- If a gas spring has been lying in stock for a while, the seal with which the nitrogen gas is kept inside can stick to the rod of the gas spring, when this sticking effect occurs stronger forces are required to compress the rod. You will need to remove the gas strut and use stronger equipment.
- The gas spring could also have been selected too strong. Verify that you have selected the correct extension force with your order.
How do I reduce excessive force on the pivot point of my cover or hatch?
The reason for this conclusion can be that:
- the hinges are not strong enough to lead this force to the non moving part.
- that the hinges cannot be sufficiently firmly attached to the cover, the hatch or to the non moving part.
- that the cover or the hatch itself, is not strong enough constructively at the location of the hinges.
When placing the hinges it is good to keep the following in mind:
- Number of hinges = number of gas springs with a minimum of 2 pieces.
- However, when one gas strut is used, then use 3 hinges: the middle hinge halfway the width of the cover and mount the gas spring, aligned with the middle hinge (see example below)
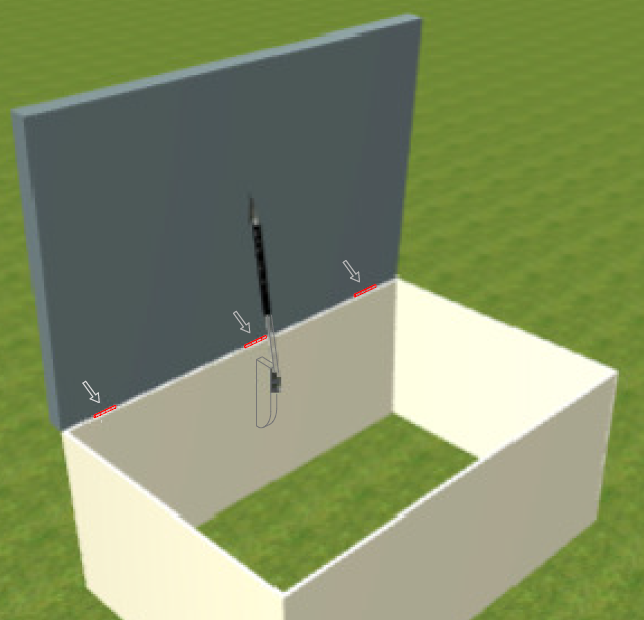
In general, therefore, the following applies: Attach a hinge as well as possible in line with each gas spring.
When this condition is met, then the load (force) per hinge is equal to the force at the pivot point divided by the number of gas struts.
This means that when we apply one gas spring, the whole force at the pivot point of the cover given by the Calculation tool, must be able to be led through one hinge to the non moving part.
If, however, we mount one gas strut halfway the width of the cover, without a 3rd hinge right behind the gas spring, then the force at the pivot point of the cover given by the Calculation tool will, nevertheless, be divided over two hinges but then the stiffness of the cover is required to lead that force to the left and to the right towards the hinges. A disadvantage here, because of the lack of the 3rd hinge, is that the cover at the location of the middle-mounted gas strut may bulge, because the gas spring continues to exert a constant pressure on the cover when the cover is closed. Especially with a wooden cover this bulge will, in the course of time, be explicitly visible (wood simply bends).
A question that can be asked afterwards is the following: “Does it make sense to mount, for example, 4 hinges whilst I am only going to apply two gas springs?”
Answer: That definitely makes sense but the hinges that are placed right behind the gas struts jointly transfer the force at the pivot point of the cover, given by the Calculation tool, to the non moving part.
When all the above are met and the load per hinge is still considered too high, what can still be done to reduce the force per loaded hinge?
Answers:
- Select a gas strut with a longer stroke in the outcome of the Calculation tool. That gas spring will be mounted further from the pivot point of the cover and will therefore also need to be less forceful so that the total reaction force at the pivot point of the cover will be lower.
- Mount more robust hinges. This is not always possible because the hinges in terms of size have to continue to be in proportion to the dimensions of the cover. Therefore, it may be considered to place two hinges per loaded hinge position that then should be mounted next to each other stiffly. This halves the load per hinge and also doubles the number of screws
Does it matter in which place I mount the hinges?
It is best to place a hinge as much as possible in line with each mounted gas spring. The reaction force, coming from the gas spring, can be led through the hinge to any non moving part .
Not placing a hinge in line with the gas spring, calls on the local strength of the cover or the hatch to lead the reaction force, via a transverse movement, still through the hinge to the mounting point. When the cover or the hatch has sufficient stiffness that is not a problem, but when the edge of the cover or the hatch has been structured as a frame, this issue demands attention.
In order to prevent uneven loads on the hinges, it is desirable to place the hinges symmetrically to the mounted gas springs.
